Photo to Bead Pattern
Turn a photo — a pet, a portrait, a favorite snapshot — into a printable fuse-bead pattern with matched bead colors and an exact count for every color. Free, in your browser, no signup.
See it in action
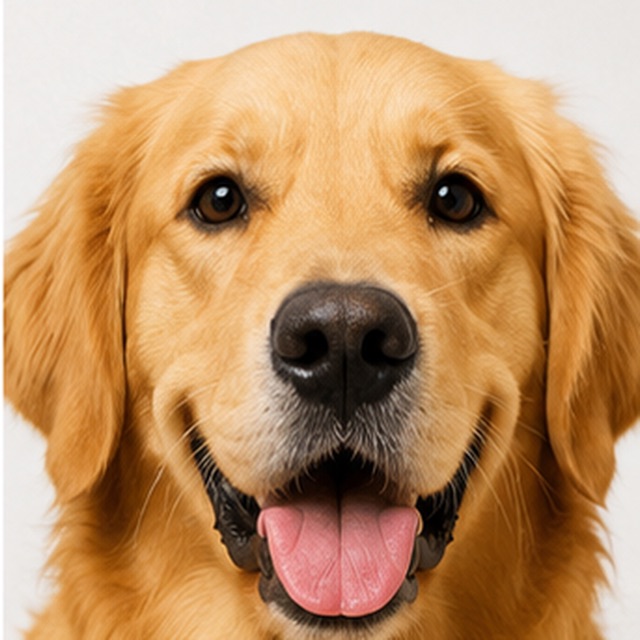
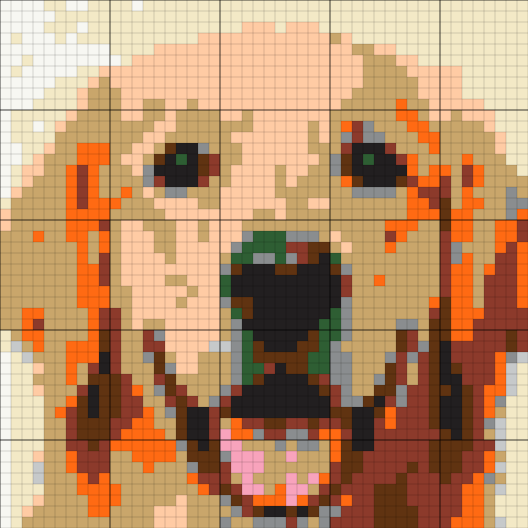
Upload your photo
It is matched to standard bead colors locally in your browser — nothing is uploaded.
Simplify and size it
Set the width in beads and watch the color counts. Photos need a little cleanup — the tips below cover it.
Print and peg
Download a printable PDF with the grid and color legend, then start pegging.
Turning a photo into beads
- Photos need simplifying
- A photo has thousands of soft, blended colors; a bead pattern has a short list of flat plastic ones. The conversion works, but it works best when you help it: crop tight to your subject so it fills the frame. A pet’s face at full frame beads beautifully — the same pet across the room becomes six brown beads in a sea of carpet.
- Width in beads
- Photos need more resolution than cartoons because likeness lives in small tonal shifts. For a recognizable face — human or animal — aim for at least 40–50 beads across the face itself. On a tight crop that means a 48–58 bead width, which is a 2×2 block of standard 29-peg boards. Simpler subjects can go smaller.
- Watch the color count
- Every color in the legend is a real tub of beads to buy and keep sorted, so the practical sweet spot for photos is 10–15 colors. Fewer, and skin or fur flattens into a single tone; more, and the chart becomes hard to follow with close shades you cannot tell apart as loose beads.
- Dithering caution
- On screen, scattering two colors fakes a third — but physical beads sit as visible dots, and heavy dithering can make a face look speckled with the wrong color rather than smoothly shaded. If a cheek or sky comes out noisy, prefer a slightly higher color count over more scatter.
- Match your pegboard
- A standard square board is 29 beads; larger patterns span boards clipped together — 58 wide is four boards, 87 wide is nine. The printed grid marks bold lines every 10 cells so you always know where you are, and where board seams fall.
- Print the legend
- The PDF lists a bead count for every color, updating live as you adjust settings. Check it against your bead stash before starting — a portrait that needs 900 beads of one skin tone is worth knowing about while the store is still open.
Photos that bead well
- Close-up pet portraits — face filling the frame
- Head-and-shoulders photos of people
- A single subject on a plain or blurred background
- Bright, high-contrast pictures with clear shapes
- Baby photos and couple shots cropped tight
Fix these first
- Wide scenes — crop to one subject before uploading
- Dark or blurry photos — brighten first; beads cannot rescue murk
- Group photos — each face gets too few beads; make one pattern per person
- Fine detail like whiskers or jewelry — it disappears at bead size
Why photos need different settings than clipart
Cartoon characters and logos are already halfway to being bead patterns — flat colors, hard outlines, simple shapes. Photos are the opposite: everything in them is a gradient, from the curve of a cheek to the sky behind it, and no continuous gradient survives translation into discrete plastic beads. Converting a photo to a bead pattern is therefore an exercise in controlled simplification, and the settings above all serve that one goal.
The general Perler Bead Pattern Generator on this site shares the same engine and is the better page for game characters and icons. This page exists because photo projects fail in photo-specific ways — muddy fur, speckled skin, vanished likeness — and every fix is a photo-specific setting: tighter crops, slightly more colors, restrained dithering, and a grid large enough for the face to breathe.
How to keep a face recognizable in beads
Likeness has a minimum resolution. Across many projects the practical floor is about 40–50 beads across the face — below that, eyes merge into shadows and the person becomes generic. That number is the reason photo patterns tend to be multi-board projects: a tight head-and-shoulders crop at 48–58 beads wide puts the face right in that readable zone on a 2×2 block of boards.
After resolution, the likeness lives in contrast. Eyes and eyebrows carry most of a face, so if the preview loses them, raise the contrast or brightness before adding beads or colors — those sliders change which tones the bead matching prioritizes. And check the preview at arm’s length, not nose-to-screen: a bead piece is viewed from across a desk, and patterns that look coarse up close often read perfectly at real distance.
Picking colors when every color is physical
On-screen pixel art can use any 16 colors for free. A bead pattern from a photo cannot: every legend entry is a purchase, and skin tones are the expensive part — a convincing face usually wants three or four adjacent tans and browns that you may not own yet. The legend doubles as the shopping list, so read it before you commit to a size.
Some practical color rules for photo patterns:
- Aim for 10–15 total colors; portraits lean toward the top of that range, pets with solid fur toward the bottom.
- Accept the nearest-match skin tones the tool picks — plastic bead ranges simply do not include every human shade, and the pattern reads correctly as a whole even when a single bead looks off alone.
- Dark backgrounds cost hundreds of beads of one color. A plain light background is cheaper and makes the subject pop.
- If two legend colors look nearly identical, cut the count until they merge — you will not be able to tell the beads apart on the table anyway.
From grid size to real-world size
Midi fuse beads are about 5mm across before ironing, which makes the finished-size math easy: width in beads × 5mm. A 29-bead single-board piece comes out around 14.5cm (5.7in) — coaster scale. A 58-bead portrait is about 29cm (11.4in), a solid desk frame. An 87-bead piece approaches 44cm (17in) and roughly 7,500 beads — a genuine wall piece and a genuine time commitment.
Bead counts scale with the square of the width, so each size step roughly quadruples the work. The honest planning question is not how big can it be but how many evenings is this photo worth — and the live legend total answers the bead half of that before you start.
Gift and memory projects
Photo bead patterns occupy a sweet spot for handmade gifts: personal like a photo, crafted like embroidery, and achievable in a weekend. The projects that consistently work are the ones with one strong subject and an emotional anchor — a pet portrait from a favorite photo, a baby picture at 48 beads wide, a couple photo cropped to two faces, a childhood home reduced to its front door and windows.
For memorial pet pieces especially, choose the photo where the animal looks most like themselves rather than the technically best shot — likeness in beads comes from characteristic markings and posture, which survive conversion far better than photographic sharpness does.
Print, peg, iron
Print the PDF at 100% scale and work in the bold 10×10 blocks the grid marks out. For faces, start from the eyes and work outward — they are the cells where a one-bead mistake matters, and placing them first keeps everything else anchored. Fill large background areas last, when accuracy matters least and momentum matters most.
Iron with paper and a medium-hot iron in slow circles until beads just fuse, flip, and repeat; multi-board pieces iron more evenly one board at a time. The result is your photo, rebuilt at 5mm resolution — and the pattern PDF means anyone can rebuild it again.
Frequently asked questions
Will a photo really work as a bead pattern?
Yes, with the right prep: crop tight to one subject, keep 10–15 colors, and give the face at least 40–50 beads of width. The tips on this page exist because photos fail in predictable ways — all of them fixable before you print.
How many beads will a portrait need?
The legend shows the exact per-color and total counts live. As a guide, a 48-bead-wide portrait runs up to about 2,300 beads, and a 58-bead piece up to 3,364 — a comfortable weekend project.
Does this work with Hama and Artkal beads?
Yes. Colors are matched to common fuse-bead shades shared across Perler, Hama, and Artkal-style midi (5mm) beads, and you match beads to the printed swatches, so the chart is brand-agnostic.
What photo should I pick for a pet pattern?
A close-up where the face fills the frame, taken at the pet’s eye level, with even lighting. Characteristic markings matter more than photographic quality — pick the photo that looks most like them.
Why does the skin tone look slightly off?
Bead ranges include a limited set of tans and browns, so the tool picks the nearest real bead color. Viewed at arm’s length the pattern reads correctly as a whole — judge the preview at distance, not per bead.
Should I use dithering for a photo pattern?
Sparingly. On physical beads heavy dithering reads as speckle rather than shading, especially on faces. If an area looks noisy, prefer one more color in the legend over more scatter.
How big will my finished piece be?
Width in beads × 5mm. A 29-bead board is about 14.5cm (5.7in) square; 48 beads is about 24cm (9.4in); 58 beads is about 29cm (11.4in) across a 2×2 block of boards.
Can I print the pattern?
Yes — the PDF includes the full grid with bold lines every 10 cells and a color legend with per-color bead counts. Large patterns paginate automatically so the cells stay readable.
Is my photo uploaded anywhere?
No. The color matching, grid, counts, and PDF are all generated in your browser. Personal photos never leave your device.
Is this photo to bead pattern converter free?
Yes — free with no signup, no watermark, and no limit on patterns or downloads.