Image to Sprite Converter
Turn a sketch, character render, or AI image into a game-ready pixel sprite. Export a transparent PNG at true size plus a scaled copy — free, in your browser.
See it in action
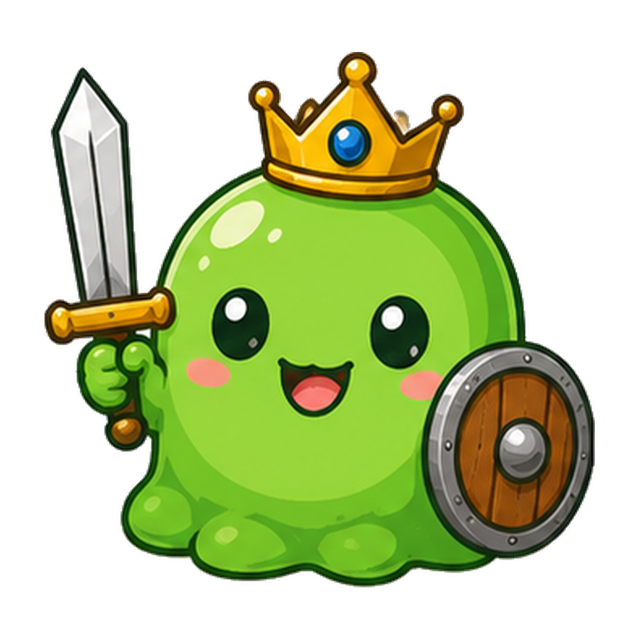
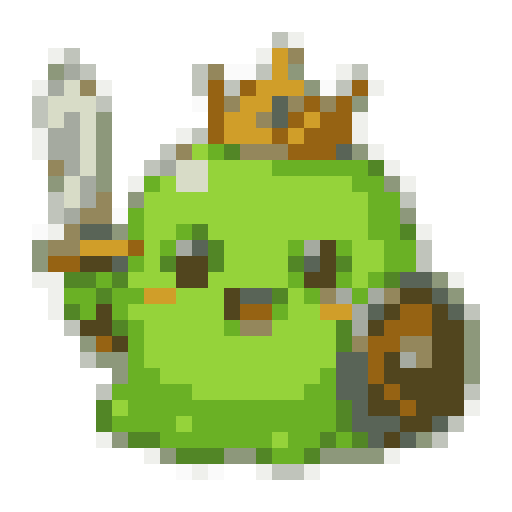
Upload your image
PNG, JPG, WEBP or GIF. Drag, click, or paste — everything is processed locally in your browser.
Adjust the result
Tune the controls and watch the preview update instantly. Nothing is uploaded to a server.
Download
Export a clean, sharp result with no watermark, ready to use anywhere.
How to make usable game sprites
- Size presets: 16, 32, 64, 128
- The converter opens at 32×32, the most common size for indie character art. Drop to 16×16 for tiles, icons, and retro projects; move up to 64×64 when a character needs facial detail; 128×128 suits bosses and large props. Smaller canvases force simpler, more readable shapes, so start small and only scale up when the silhouette stops reading.
- Transparent background
- Upload a PNG cutout with a transparent background and the alpha channel survives conversion — the exported file drops straight into Unity, Godot, or GameMaker with no white box around it. If your source is a photo or a flat JPG, remove the background first: the tool pixelates whatever it is given, background included.
- Color count
- Keep it at 16 colors or fewer — that ceiling is deliberate. Classic 2D games used 4–16 colors per sprite, and a low count is what makes the result look designed instead of like a shrunken photo. Try 8 first for items and icons, 12–16 for characters, and add colors back only if the shading bands look wrong.
- Palette lock
- A project full of sprites converted with random colors looks incoherent. Lock one palette — PICO-8, an NES-style set, or your own — and run every character, item, and prop through it. Shared colors are the cheapest possible way to make separately converted assets read as one game made by one artist.
- Dual PNG export: 1× plus scaled
- Every download gives you two files: the true-size image (a 32×32 export is literally 32×32 pixels) and an enlarged copy with hard nearest-neighbor edges. Import the 1× file into your engine and let the engine do the scaling; use the enlarged copy for previews, mockups, and store pages where a 32-pixel file would render as a speck.
- Source contrast
- The converter keeps what contrasts. Before uploading, check that your subject has a strong outline and clear internal shapes — a dark character on a dark ground turns to mush at game resolution. Ten seconds spent boosting contrast or thickening line art in any editor saves ten minutes of pixel-by-pixel retouching afterward.
Good sprite sources
- Character art and mascots with bold outlines
- Game items: weapons, potions, coins, keys
- Icons and logos with flat color fills
- AI character art on a plain background
- Cutouts that already have transparency
Prep these first
- Photos — cut the subject out first, then convert
- Busy scenes with several subjects — crop to one
- Thin lines and small text — they vanish below 64×64
- Soft gradients and glows — they band at low color counts
- Low-contrast art — boost contrast before uploading
How to convert an image to a sprite that reads at game scale
A sprite succeeds or fails on its silhouette. At 32×32, players never see brushwork or texture — they see an outline moving across a screen, and they identify it in a fraction of a second or not at all. So before touching any slider, judge your source image by shape alone: if you squint and can still tell it is a knight, a potion, or a spaceship, it will convert well.
That is the silhouette-first rule, and it drives everything else on this page. Crop tight so the subject fills the frame — empty margin steals pixels the subject needs. Pick a source with one clear mass rather than several overlapping ones. And accept that interior detail is negotiable: a face can become four pixels and still work, but a broken outline never does.
Picking a sprite size: 16×16 vs 32×32 vs 64×64
Size is the first real decision, and it should match your game, not your source image. The converter defaults to 32×32 because it is the modern indie standard, but every preset has a job:
Mixing sizes within a project is normal — a 16×16 coin next to a 32×32 hero is standard practice. What matters is that each asset category stays consistent, and that everything shares one pixel density so nothing looks accidentally high-res next to its neighbors.
- 16×16 — tiles, item icons, pickups, and full characters in dense retro styles. Every pixel counts; expect to simplify hard.
- 32×32 — the default for player characters and enemies in most 2D games. Enough room for a readable face, weapon, and pose.
- 64×64 — detailed characters, portraits, and large props. Expressions and gear read clearly, but cleanup takes longer.
- 128×128 — bosses, splash images, and UI art. At this size you are closer to illustration than classic low-res work.
Why pixel sprites use 4–16 colors
The 16-color ceiling in this tool is not a limitation to work around — it is what makes the output look right. Hardware from the NES through the Game Boy Advance restricted palettes per sprite, and artists turned that constraint into a style: flat fills, one or two shade steps, and strong contrast between subject and background.
When a converter keeps hundreds of colors, the result is just a small blurry photo. When it clamps to 8 or 12, adjacent pixels snap to shared colors, edges become deliberate stair-steps, and shading collapses into clean bands. Reduce the count until something important disappears — the sweet spot is usually one step above that.
Importing your sprite into Unity and Godot
Engines assume imported textures are photos and quietly ruin pixel art with smoothing and compression. Two settings fix ninety percent of blurry-sprite complaints.
In Unity, select the imported PNG and set Filter Mode to Point (no filter), Compression to None, and Pixels Per Unit to the pixel size — 32 for a 32×32 file — so one world unit equals one character. Turn off Generate Mip Maps; mipmaps exist for 3D distance rendering and only add blur in 2D.
In Godot 4, set the texture filter to Nearest — per node under CanvasItem > Texture > Filter, or project-wide in Project Settings under Rendering > Textures > Default Texture Filter. Leave the lossless import default alone and skip mipmaps. In both engines, always import the 1× export and scale in-engine; pre-scaled art wastes memory and breaks pixel snapping.
Transparent PNG export and the 1×/scaled pair
Every conversion downloads as a PNG with the source alpha intact, in two versions: one at true size and an enlarged copy scaled with hard edges. They have different jobs. The 1× file is the one you ship — engines want real pixel dimensions, and it is usually under a kilobyte. The scaled copy exists because a 32×32 file looks like a dot in a file browser or a chat window; use it for itch.io pages, pitch decks, social posts, and anywhere humans preview your art. If someone asks which file to import, the answer is always the small one.
Converter, AI sprite generator, or drawing from scratch?
An AI sprite generator invents new art from a text prompt — useful when you have nothing, but you get limited control over pose, proportions, and palette, and matching an existing style across dozens of assets is a fight. Drawing by hand in Aseprite gives total control and the best possible results, at the cost of hours per asset and a real skill curve.
This converter sits between the two: you supply the art — a sketch, a commissioned character, a 3D render, or an AI image you already like — and it handles the mechanical part of getting it to game resolution and a tight palette. The typical workflow for non-artists is generate or sketch first, convert here, then spend five minutes of cleanup on the 1× file in any pixel editor.
Frequently asked questions
Does it export a transparent PNG?
Yes. If the uploaded image has an alpha channel, the exported file keeps it — both the 1× version and the enlarged copy. The result drops directly into Unity, Godot, GameMaker, or any engine with no background to key out.
What size should a game sprite be?
Match your engine and tile grid. 16×16 suits retro styles and item icons, 32×32 is the modern indie default for characters, and 64×64 fits detailed characters and portraits. When in doubt, start with the 32×32 preset and test it inside your game at real zoom.
Can it generate a sprite sheet?
No. This tool converts one image into one sprite. A sprite sheet packs multiple animation frames into a single texture, which is a separate step — convert each frame here, then assemble the sheet in your engine or a packer like TexturePacker.
Why does my sprite look blurry in my game engine?
Texture filtering — engines smooth textures by default. In Unity set Filter Mode to Point (no filter) and Compression to None; in Godot set the texture filter to Nearest. Also confirm you imported the 1× export, not the enlarged preview copy.
How do I keep assets from different images consistent?
Use the same size preset, the same color count, and a locked palette for every asset in the project. Shared colors and shared pixel density are what make separately converted images look like they came from one artist.
Can I convert AI-generated images?
Yes — AI character art is one of the best sources, since it usually has a single centered subject on a plain background. Generate the art in any tool, remove the background if needed, then convert it here to game resolution and a tight palette.
Which of the two downloaded files goes in my game?
The small one. Engines expect true pixel dimensions and handle scaling themselves. The enlarged copy is for previews — store pages, mockups, chat — where a 32-pixel file would be unreadably tiny.
Do my images get uploaded to a server?
No. Conversion runs entirely in your browser on a local canvas. Your image never leaves your device — nothing is uploaded, stored, or shared, and there is no file-size quota imposed by a server.
Is the converter free?
Yes — free, no signup, no watermark, and no export limits. All size presets, palette locking, and transparent PNG export are included.
What file types can I upload?
PNG, JPG, WEBP, and GIF. A PNG with a transparent background is the best source for game assets because the alpha survives export. For animated GIFs, use the dedicated GIF to pixel art converter instead.